The Beginner’s Guide to Creating an API with GraphQL, SpringBoot, and MySQL Database
September 9, 2020 3:11 pm | by Ramgopal Lamrod | Posted in Tech
GraphQL is an advanced level query language for APIs and a runtime for fulfilling those queries with your existing data. It provides a complete and understandable description of the data available in your API, empowers the clients to fetch exactly what they need, makes it easier to evolve APIs over time, and enables powerful developer tools.
Why GraphQL?
GraphQL is a query language for REST API endpoints.
- No need to create multiple APIs.
- Get many resources in a single request.
- Using GraphQL, we get the exact data:
Creating an Application:
Visit Spring Initializr or use IntelliJ IDEA Ultimate to generate a Spring Boot application with dependencies like Web, database, Spring Boot 2.1.4. It will be a Maven project with JDK 1.8.
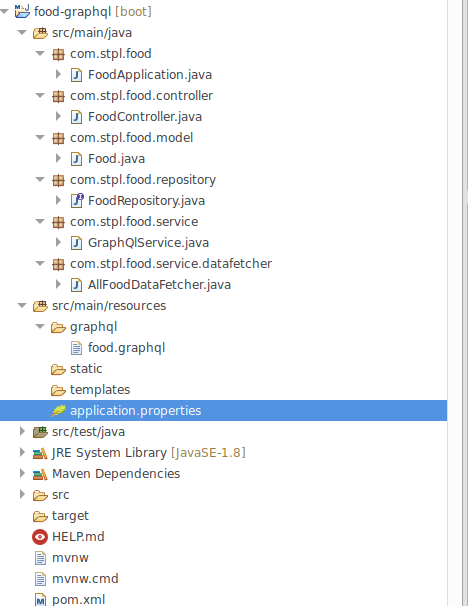
Application Structure:
<artifactId>spring-boot-starter-data-jpa</artifactId>
        </dependency>
        <dependency>
            <groupId>org.springframework.boot</groupId>
            <artifactId>spring-boot-starter-web</artifactId>
        </dependency>
        <dependency>
            <groupId>org.projectlombok</groupId>
            <artifactId>lombok</artifactId>
            <optional>true</optional>
        </dependency>
        <dependency>
            <groupId>org.springframework.boot</groupId>
            <artifactId>spring-boot-starter-test</artifactId>
            <scope>test</scope>
        </dependency>
        <dependency>
			<groupId>mysql</groupId>
			<artifactId>mysql-connector-java</artifactId>
			<scope>runtime</scope>
		</dependency>

        <dependency>
            <groupId>com.graphql-java</groupId>
            <artifactId>graphql-spring-boot-starter</artifactId>
            <version>3.6.0</version>
        </dependency>
        <dependency>
            <groupId>com.graphql-java</groupId>
            <artifactId>graphql-java-tools</artifactId>
            <version>3.2.0</version>
        </dependency>
Creating Model Class:
Now create a model class ‘Food’ and use parameters ID(Long), Name(String), Address (String), Event(String).
package com.stpl.food.model;

import java.io.Serializable;
import javax.persistence.Entity;
import javax.persistence.GeneratedValue;
import javax.persistence.GenerationType;
import javax.persistence.Id;
import javax.persistence.Table;

@Entity
@Table(name = "food")
public class Food implements Serializable{

  private static final long serialVersionUID = 1L;

  @Id
  @GeneratedValue(strategy = GenerationType.AUTO)
  private Long id;

  private String name;

  private String address;

  private String event;

  public Food(Long id, String name, String address, String event) {
    this.id = id;
    this.name = name;
    this.address = address;
    this.event = event;
  }

  public Food() {
  }

  public Long getId() {
    return id;
  }

  public void setId(Long id) {
    this.id = id;
  }

  public String getName() {
    return name;
  }

  public void setName(String name) {
    this.name = name;
  }

  public String getAddress() {
    return address;
  }

  public void setAddress(String address) {
    this.address = address;
  }

  public String getEvent() {
    return event;
  }

  public void setEvent(String event) {
    this.event = event;
  }

  @Override
  public String toString() {
    return "Food [id=" + id + ", name=" + name + ", address=" + address + ", event="+event+"]";
  }

}
Creating Controller:
Here is the API endpoint.
package com.stpl.food.controller;

import graphql.ExecutionResult;
import org.springframework.beans.factory.annotation.Autowired;
import org.springframework.http.HttpStatus;
import org.springframework.http.ResponseEntity;
import org.springframework.web.bind.annotation.PostMapping;
import org.springframework.web.bind.annotation.RequestBody;
import org.springframework.web.bind.annotation.RestController;
import com.stpl.food.service.GraphQlService;

@RestController
public class FoodController {

  @Autowired
  private GraphQlService graphQLService;

  @PostMapping("/food")
  public ResponseEntity<Object> getAllFood(@RequestBody String query) {
    ExecutionResult execute = graphQLService.executeGraphQL(query);
    return new ResponseEntity<>(execute, HttpStatus.OK);
  }
}
Creating a Food Repository:
Extend JpaRepository to fetch data from mysql database.
package com.stpl.food.repository;

import org.springframework.stereotype.Repository;
import com.stpl.food.model.Food;
import org.springframework.data.jpa.repository.JpaRepository;

@Repository
public interface FoodRepository extends JpaRepository<Food, Long>{

}
Adding a GraphQL Schema:
Add a schema file in resource/graphql folder, named food.graphql
When a user queries all the foods (by using allFoods), then the application will return an array of Food.
schema{
  query:Query
}

type Query{
  allFoods: [Food]
}
type Food {
     id: ID!
     name: String!
     address: String!
     event: String
}
Adding a Service:
Now let’s create a service to pick the data.
When the Spring Boot application runs, the Spring Framework calls the @PostConstruct method. The code inside the @PostConstruct method will load the foods into the HQL database.
package com.stpl.food.service;

import java.io.File;
import java.io.IOException;
import javax.annotation.PostConstruct;
import org.springframework.beans.factory.annotation.Autowired;
import org.springframework.beans.factory.annotation.Value;
import org.springframework.core.io.Resource;
import org.springframework.stereotype.Service;
import com.stpl.food.service.datafetcher.AllFoodDataFetcher;
import graphql.ExecutionResult;
import graphql.GraphQL;
import graphql.schema.GraphQLSchema;
import graphql.schema.idl.RuntimeWiring;
import graphql.schema.idl.SchemaGenerator;
import graphql.schema.idl.SchemaParser;
import graphql.schema.idl.TypeDefinitionRegistry;

@Service
public class GraphQlService {

  @Autowired
  private AllFoodDataFetcher allFoodDataFetcher;

  @Value("classpath:graphql/food.graphql")
  Resource resource;
  private GraphQL graphQL;

  @PostConstruct
  private void loadSchema() throws IOException {

    File file = resource.getFile();

    // Get the graphql file
    TypeDefinitionRegistry typeDefinitionRegistry = new SchemaParser().parse(file);
    RuntimeWiring runtimeWiring = buildRuntimeWiring();
    GraphQLSchema graphQLSchema
      = new SchemaGenerator().makeExecutableSchema(typeDefinitionRegistry, runtimeWiring);
graphQL = GraphQL.newGraphQL(graphQLSchema).build();
  }

  private RuntimeWiring buildRuntimeWiring() {
    return RuntimeWiring.newRuntimeWiring()
      .type("Query",
        typeWiring -> typeWiring
        .dataFetcher("allFoods", allFoodDataFetcher))
      .build();
  }

  public ExecutionResult executeGraphQL(String query) {
    return graphQL.execute(query);
  }

}
Adding Data Fetchers:
Each field in graphql has a graphql.schema.DataFetcher associated with it.
package com.stpl.food.service.datafetcher;

import java.util.List;
import org.springframework.beans.factory.annotation.Autowired;
import org.springframework.stereotype.Component;
import com.stpl.food.model.Food;
import com.stpl.food.repository.FoodRepository;
import graphql.schema.DataFetcher;
import graphql.schema.DataFetchingEnvironment;

@Component
public class AllFoodDataFetcher implements DataFetcher<List<Food>> {

  @Autowired
  private FoodRepository foodRepository;

  @Override
  public List<Food> get(DataFetchingEnvironment environment) {
    return foodRepository.findAll();
  }
}
Configuration:
Application.properties

spring.datasource.url=jdbc:mysql://localhost:3306/graphqldemo
spring.datasource.username={username}
spring.datasource.password={password}

server.port=8889

Database: Create database graphql.
Insert data in food table:

INSERT INTO `food` (`id`, `address`, `event`, `name`) VALUES ('1', 'Plot no 8 jaipur', 'birthday', 'sarvika');

INSERT INTO `food` (`id`, `address`, `event`, `name`) VALUES ('2', 'Plot no 9 jaipur', 'birthday', 'sarvika');

INSERT INTO `food` (`id`, `address`, `event`, `name`) VALUES ('3', 'Plot no 10 jaipur', 'marriage', 'sarvika');
Running the Application:
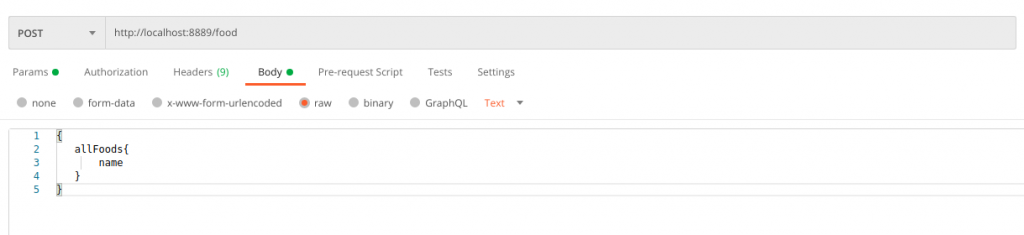
Running on 8889 port http://localhost:8889/food
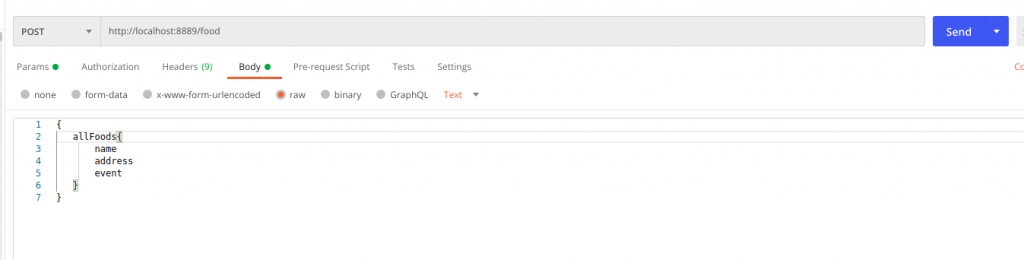
Request:
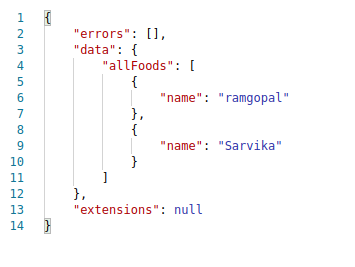
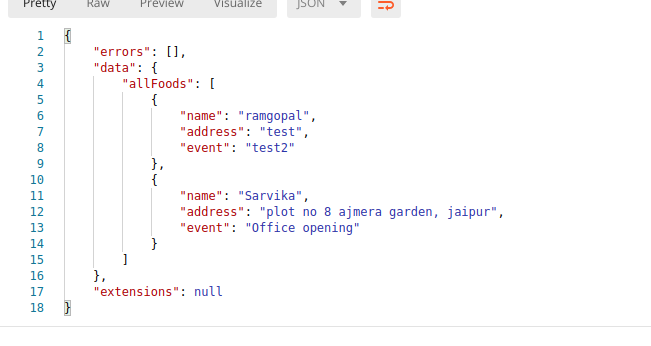
Response:
I hope the blog was able to decipher the basics of GraphQL language. If you wish to download the complete code, here is my Github Link: https://github.com/ramgopal002/graphqldemo
Or if you wish to get in touch with me, then please write to me at hello@sarvika.com.
Written by Ramgopal Lamrod
Always put your client first, this is the mantra of our senior application developer Ramgopal. He’s one of the three-member team that started Sarvika Technologies and is responsible for building the complete eCommerce enterprise and managing multiple stores for the first client. A serious coder with a dash of naughtiness, Ramgopal carries more than six years of development experience and has a graduate degree in Computer Science. Off work, he enjoys gardening and taking up charity work to help the less privileged.